ആമുഖം
റീയാക്ട് ഡോക്യുമെന്റേഷനിലേക്ക് സ്വാഗതം! ദിവസേന ഒരാൾ ഉപയോഗിക്കാൻ സാധ്യത ഉള്ള 80% ആശയങ്ങളും ഈ ഒരു പേജിലൂടെ നിങ്ങൾക്ക് പഠിക്കാം.
ഈ ചാപ്റ്ററിൽ പഠിക്കുന്നത്
- എങ്ങനെ componentകൾ ഉണ്ടാക്കാം?
- componentകളെ എങ്ങനെ style ചെയ്യാം?
- എങ്ങനെ componentൽ data കാണിക്കാം?
- conditionകളും listകളും എങ്ങനെ render ചെയ്യാം?
- events നടക്കുമ്പോൾ എങ്ങനെ സ്ക്രീനിൽ മാറ്റങ്ങൾ വരുത്താം?
- എങ്ങനെ രണ്ടു componentsനിടയിൽ data പങ്കിടാം?
എങ്ങനെ componentകൾ ഉണ്ടാക്കാം
നമ്മൾ ഒരു ബ്രൗസറിന്റെ സ്ക്രീനിൽ കാണുന്നതിനെ UI (User Interface) എന്ന് പറയാം. ഒരു ബട്ടൺ, അല്ലെങ്കിൽ ഒരു പേയ്മെന്റ് പേജ് ഒക്കെ ഒരു UIടെ ഭാഗമാണ്. സ്വന്തമായി യുക്തി(logic)യും രൂപവും ഉള്ള ഒരു UI (User Interface)ന്റെ ഒരു ഭാഗത്തെ നമുക്ക് React component എന്ന് വിളിക്കാം. എല്ലാ React അപ്ലിക്കേഷനുകളും components കൊണ്ട് നിർമിച്ചിരിക്കുന്നു. അതായത് ഒരു ബട്ടൺ, അല്ലെങ്കിൽ ഒരു മുഴുവൻ പേജ് ഒക്കെ നമുക്ക് component ആയിട്ട് ഉണ്ടാക്കാം.
ചുരുക്കി പറഞ്ഞാൽ “markup” return ചെയ്യുന്ന ഒരു javascript function ആണ് ഒരു React component:
function MyButton() {
  return (
    <button>I'm a button</button>
  );
}
മുകളിൽ ഒരു MyButton component നിർവചിച്ചിരിക്കുന്നു. ചിലപ്പോൾ ഈ component വേറൊരു componentന്റെ ഉള്ളിൽ ഉപയോഗിക്കേണ്ടി വരും:
export default function MyApp() {
  return (
    <div>
      <h1>Welcome to my app</h1>
      <MyButton />
    </div>
  );
}
<MyButton /> ഒരു ക്യാപിറ്റൽ ലെറ്റർ വെച്ചു സ്റ്റാർട്ട് ചെയ്യുന്നത് ശ്രദ്ധിച്ചോ? എല്ലാ React componentsഉം അങ്ങനെ ആണ് തുടങ്ങുക. componentകൾ എല്ലാം ക്യാപിറ്റൽ ലെറ്റർ വെച്ചു തുടങ്ങും, അതുപോലെ HTML ടാഗുകൾ ലോവർ കേസും ആയിരിക്കും.
മുകളിലെ കോഡ് താഴെ ഉള്ളത് പോലെ ആണ് ഒരു ബ്രൗസറിൽ കാണുക. ഒരു ബ്രൗസറിൽ React കാണിക്കുന്നതിനെ നമുക്കു React render ചെയ്യുക എന്നും പറയാം. അതായത് താഴെ ഇടത് ഭാഗത്തുള്ള കോഡ് React വലത് ഭാഗത്തു render ചെയ്തിരിക്കുന്നു
function MyButton() {
  return (
    <button>
      I'm a button
    </button>
  );
}

export default function MyApp() {
  return (
    <div>
      <h1>Welcome to my app</h1>
      <MyButton />
    </div>
  );
}
നമ്മുടെ കോഡിൽ export default എന്ന ഭാഗം ശ്രദ്ധിച്ചോ? അങ്ങനെ ആണ് നമ്മൾ ഒരു ഫയലിലെ മെയിൻ componentനെ export ചെയ്യുക. ഈ export ഭാഗം കൂടുതൽ മനസ്സിലാക്കാൻ, MDN അതുപോലെ javascript.info ലിങ്കുകൾ ഉപയോഗിക്കാം. ഒരു component export ചെയ്താൽ മാത്രമേ നമുക്ക് മറ്റു ഫയലുകളിൽ ഉപയോഗിക്കാൻ കഴിയുകയുള്ളു.
JSX ഉപയോഗിച്ചു markup എഴുതുമ്പോൾ
നമ്മുടെ componentലെ (MyApp) കാണാൻ HTML പോലെ ഉള്ള markup ശ്രദ്ധിച്ചോ? അതിനെ JSX എന്ന് പറയുന്നു. ഒരു React Componentനു JSX വേണം എന്ന് നിർബന്ധമില്ല, എങ്കിലും ഒരു വിധ എല്ലാ പ്രൊജെക്ടുകളും എളുപ്പത്തിൽ component എഴുതാൻ JSX ഉപയോഗിക്കുന്നു. ഈ പേജിൽ പറയുന്ന എല്ലാ ടൂൾസും വേറെ ഒന്നും ചെയ്യാതെ തന്നെ JSX സപ്പോർട്ട് ചെയ്യും.
റൂൾസിന്റെ കാര്യത്തിൽ HTML വെച്ച് നോക്കുമ്പോൾ JSX കുറച്ചു കൂടെ കര്ശനമാണ്. <br /> പോലുള്ള റ്റാഗുകൾ കറക്റ്റ് ക്ലോസ് ചെയ്യണം, തന്നെയുമല്ല, ഒരു component ഒന്നിൽ കൂടുതൽ JSX റ്റാഗുകൾ return ചെയ്യരുത്. അങ്ങനെ ചെയ്യണമെങ്കിൽ എല്ലാ ടാഗുകളും ഒരു പാരന്റ് ടാഗിൽ പൊതിഞ്ഞു return ചെയ്യണം. ഉദാഹരണത്തിന് ഒരു <div>...</div> അല്ലെങ്കിൽ ഒരു <>...</> വെച്ചു പൊതിഞ്ഞാലേ നമ്മുടെ JSX ശെരി ആവുകയുള്ളൂ:
function AboutPage() {
  return (
    <>
      <h1>About</h1>
      <p>Hello there.<br />How do you do?</p>
    </>
  );
}
നിങ്ങൾക്കു കുറെ അധികം HTML റ്റാഗ്സ് JSXലേക്ക് മാറ്റാൻ ഉണ്ടെങ്കിൽ ഈ ഒരു ഓൺലൈൻ കൺവെർട്ടർ ഉപയോഗിക്കാം
componentകളെ എങ്ങനെ style ചെയ്യാം?
React componentൽ ഒരു CSS ക്ലാസിനു വേണ്ടി നമ്മൾ className ഉപയോഗിക്കണം. HTMLൽ ഉള്ള class ടാഗും React className ടാഗും ഒരുപോലെ ആണ് വർക്ക് ചെയ്യുക.
<img className="avatar" />ശേഷം വേണ്ട CSS വേറെ ഒരു ഫൈലിൽ എഴുതുക
/* In your CSS */
.avatar {
  border-radius: 50%;
}
ഇതിനു ശേഷം എങ്ങനെ ആണ് നമ്മൾ ഈ CSS ഫയൽ പ്രോജെക്ടിൽ ആഡ് ചെയ്യുന്നത് എന്നതിന് Reactനു പ്രത്യേക റൂൾ ഒന്നുമില്ല. വേണമെങ്കിൽ നേരിട്ട് ഒരു link HTMLൽ കൊടുക്കാം. ഇനി നിങ്ങൾ ഒരു ബിൽഡ് ടൂലോ ഫ്രെയിംവർക്കോ ഉപയോഗിച്ചു CSS ആഡ് ചെയ്താലും ഇത് വർക്ക് ചെയ്യും.
എങ്ങനെ componentൽ data കാണിക്കാം?
JSX ഉപയോഗിച്ചപ്പോൾ നമുക്കു JavaScriptന്റെ ഉള്ളിൽ markup എഴുതാൻ സാധിച്ചു. JSXന്റെ ഉള്ളിൽ Curly braces ഉപയോഗിച്ചാൽ നമുക്ക് തിരിച്ചു JSXന്റെ ഉള്ളിൽ JavaScript റൺ ചെയ്യാം. താഴെ ഉള്ള example നോക്കൂ, നമ്മുടെ കോഡിലെ user.name എന്ന ഒരു വേരിയബിന്റെ വാല്യൂ, ഇങ്ങനെ കൊടുക്കുമ്പോൾ സ്ക്രീനിൽ render ചെയ്യും:
return (
  <h1>
    {user.name}
  </h1>
);
ഇനി നമുക്ക് JSXന്റെ ഏതേലും attributes ആണ് ഇങ്ങനെ മാറ്റേണ്ടതെങ്കിലും ഈ “Curly braces” തന്നെ ഉപയോഗിക്കാം. ഉദാഹരണത്തിന്, className="avatar" എന്നത് "avatar" എന്ന വാചകം (string) CSS ക്ലാസ്സായി കൈമാറുന്നു, എന്നാൽ src={user.imageUrl} എന്നത് user.imageUrlന്റെ വാല്യൂ എടുത്ത് ആ വാല്യൂ ആണ് CSS ക്ലാസ്സായിട്ടു കൊടുക്കുക:
return (
  <img
    className="avatar"
    src={user.imageUrl}
  />
);
JSX Curly braces ഇതിലും കോംപ്ലക്സ് ആയിട്ടുള്ള കാര്യങ്ങൾക്കും ഉപയോഗിക്കാം, for example, string concatenation:
const user = {
  name: 'Hedy Lamarr',
  imageUrl: 'https://i.imgur.com/yXOvdOSs.jpg',
  imageSize: 90,
};

export default function Profile() {
  return (
    <>
      <h1>{user.name}</h1>
      <img
        className="avatar"
        src={user.imageUrl}
        alt={'Photo of ' + user.name}
        style={{
          width: user.imageSize,
          height: user.imageSize
        }}
      />
    </>
  );
}
മുകളിൽ, style={{}} എന്നത് ഒരു സ്പെഷ്യൽ syntax ഒന്നുമല്ല. ഒരു സാധാരണ object {} നേരത്തെ പറഞ്ഞ Curly bracesന്റെ (style={ }) ഉള്ളിൽ വന്നതാണ്. ഇവിടെ നമ്മൾക്കു കൊടുക്കേണ്ട styles, JavaScript വേരിയബിളിൽ നിന്ന് വന്നപ്പോൾ നമ്മൾ Curly braces ഉപയോഗിച്ചു എന്ന് മാത്രം.
condition എങ്ങനെ render ചെയ്യാം?
React-ൽ, conditions എഴുതാൻ ഒരു പ്രത്യേക syntax ഒന്നുമില്ല. നമ്മൾ സാധാരണ JavaScript കോഡിൽ എഴുതുന്നത് പോലെ React-ലും എഴുതാം. ഉദാഹരണത്തിന്, ഒരു if സ്റ്റേറ്റ്മെന്റ് JSX-ന്റെ ഉള്ളിൽ നേരിട്ട് ഉപയോഗിക്കാം:
let content;
if (isLoggedIn) {
  content = <AdminPanel />;
} else {
  content = <LoginForm />;
}
return (
  <div>
    {content}
  </div>
);
കോഡ് കുറച്ചു കൂടെ ചെറുതാക്കണമെങ്കിൽ ifനു പകരം conditional ? operator. ഉപയോഗിക്കാവുന്നതാണ്. ഇത് JSX-ന്റെ ഉള്ളിൽ നേരിട്ട് എഴുതാനും പറ്റും:
<div>
  {isLoggedIn ? (
    <AdminPanel />
  ) : (
    <LoginForm />
  )}
</div>
ഇനി else ബ്രാഞ്ച് വേണ്ടെങ്കിൽ നമുക്ക് കുറച്ചു കൂടെ ഹ്രസ്വമായ logical && syntax ഉപയോഗിക്കാം:
<div>
  {isLoggedIn && <AdminPanel />}
</div>
മുകളിൽ പറഞ്ഞ എല്ലാ വഴികളും attributesനും ബാധകമാണ്. ഈ പുതിയ syntax മനസ്സിലായില്ലെങ്കിൽ, എപ്പോഴും if...else ഉപയോഗിക്കാം.
list എങ്ങനെ render ചെയ്യാം?
condition പോലെ തന്നെ, list render ചെയ്യാനും React-നു പ്രത്യേക syntax ഇല്ല. JavaScript-ന്റെ ഭാഗമായ for loop അതുപോലെ array map() function ഉപയോഗിച്ച് നമുക്ക് component-ന്റെ list-കൾ render ചെയ്യാം.
ഉദാഹരണത്തിന്, നിങ്ങൾക്ക് ഒരു കുറെ പ്രോഡക്ടസ് ഉണ്ടെന്നു സങ്കല്പിക്കുക. (array of products):
const products = [
  { title: 'Cabbage', id: 1 },
  { title: 'Garlic', id: 2 },
  { title: 'Apple', id: 3 },
];
നമ്മുടെ componentന്റെ ഉള്ളിൽ ഒരു map() function ഉപയോഗിച്ചാൽ, ഈ array of productsനെ നമുക്ക് ഒരു array of <li> ഐറ്റംസ് ആക്കി മാറ്റാം:
const listItems = products.map(product =>
  <li key={product.id}>
    {product.title}
  </li>
);

return (
  <ul>{listItems}</ul>
);<li>ക്കു ഒരു key attribute കൊടുത്തത് ശ്രദ്ധിച്ചോ? ഒരു ലിസ്റ്റിലെ എല്ലാ ഐറ്റത്തിനും നമ്മൾ അതിനെ വ്യക്തമായി വേർതിരിക്കാൻ പറ്റിയ ഒരു key കൊടുക്കണം. അത് ഒരു string അല്ലെങ്കിൽ ഒരു number ആവാം. ഈ key വെച്ചാണ് React ഐറ്റംസിനു എന്തെങ്കിലും മാറ്റങ്ങൾ വന്നിട്ടുണ്ടോ എന്ന് മനസ്സിലാക്കുന്നത്. പറ്റുമെങ്കിൽ ഈ key നിങ്ങളുടെ ഡാറ്റയിൽ നിന്ന് തന്നെ വരണം. (Ex: database ID). ഒരു ലിസ്റ്റിൽ ഒരു key ഒരു പ്രാവശ്യം മാത്രമേ വരാൻ പാടുള്ളൂ.
const products = [
  { title: 'Cabbage', isFruit: false, id: 1 },
  { title: 'Garlic', isFruit: false, id: 2 },
  { title: 'Apple', isFruit: true, id: 3 },
];

export default function ShoppingList() {
  const listItems = products.map(product =>
    <li
      key={product.id}
      style={{
        color: product.isFruit ? 'magenta' : 'darkgreen'
      }}
    >
      {product.title}
    </li>
  );

  return (
    <ul>{listItems}</ul>
  );
}
events നടക്കുമ്പോൾ എങ്ങനെ പ്രതികരിക്കാം?
വ്യത്യസ്ത eventകൾ നടക്കുമ്പോൾ componentന്റെ ഉള്ളിൽ event handler functions വെച്ചു നമുക്ക് പ്രതികരിക്കാം:
function MyButton() {
  function handleClick() {
    alert('You clicked me!');
  }

  return (
    <button onClick={handleClick}>
      Click me
    </button>
  );
}
onClick={handleClick} എന്ന ഭാഗത്തു Parenthesis ഇല്ലാത്തത് ശ്രദ്ധിച്ചോ? നമ്മൾ ഒരിക്കലും event handler function നേരിട്ട് വിളിക്കരുത്. ഇവിടെ onClick നു നമ്മൾ handleClick pass down ആണ് ചെയ്യുന്നത്. React ആണ് യൂസർ ബട്ടണിൽ ക്ലിക്ക് ചെയ്യുമ്പോൾ ആ handleClick വിളിക്കുക.
സ്ക്രീൻ അപ്ഡേറ്റ് ചെയ്യാൻ
പലപ്പോഴും നമ്മുടെ component ചില കാര്യങ്ങൾ ഓർത്തിരിക്കേണ്ട ആവശ്യം നമുക്ക് വരും. ഉദാഹരണത്തിന്, എത്ര പ്രാവശ്യം ഒരു ബട്ടണിൽ യൂസർ ക്ലിക്ക് ചെയ്തു എന്ന് നമുക്ക് അറിയണം എന്ന് വെക്കുക, അങ്ങനെ ചെയ്യാൻ നമുക്ക് Reactന്റെ state എന്ന ആശയം ഉപയോഗിക്കണം.
ആദ്യമായി നമ്മൾ useState നമ്മുടെ component-ലേക്ക് import ചെയ്യണം:
import { useState } from 'react';ഇനി നമുക്ക് ഒരു state variable ഡിക്ലയർ ചെയ്യാം:
function MyButton() {
  const [count, setCount] = useState(0);
  // ...
രണ്ടു കാര്യങ്ങളാണ് നമുക്ക് useState-ൽ നിന്നും തിരിച്ചു ലഭിക്കുക. ഇപ്പോഴുള്ള അവസ്ഥ (React-ന്റെ വാക്കുകളിൽ state), കൂടെ ആ state മാറ്റാനുള്ള ഒരു function. മുകളിലെ ഉദാഹരണത്തിൽ count ആണ് state. അതുപോലെ setCount ആണ് state മാറ്റാനുള്ള function. നമുക്ക് എന്ത് പേര് വേണമെങ്കിലും ഇതിനു കൊടുക്കാം, എങ്കിലും [something, setSomething] എന്ന രീതിയിലാണ് നമ്മൾ അത് എഴുതേണ്ടത്.
ആദ്യ തവണ button render ചെയ്യപ്പെട്ടപ്പോൾ, count-ന്റെ വാല്യൂ 0 ആയിരിക്കും, കാരണം നമ്മൾ 0 എന്നാണ് useState ന്റെ ഘടകം ആയിട്ട് കൊടുത്തത്. useState(0) എന്ന് കണ്ടില്ലേ? ഇനി ആ വാല്യൂ നമുക്ക് മാറ്റണമെങ്കിൽ, നമ്മൾ setCount-നു പുതിയ വാല്യൂ വെച്ച് വിളിച്ചാൽ മതി. താഴത്തെ ഉദാഹരണത്തിൽ, button ക്ലിക്ക് ചെയ്യപ്പെടുമ്പോൾ, count വാല്യൂ കൂടിക്കൊണ്ടിരിക്കും:
function MyButton() {
  const [count, setCount] = useState(0);

  function handleClick() {
    setCount(count + 1);
  }

  return (
    <button onClick={handleClick}>
      Clicked {count} times
    </button>
  );
}
യൂസർ ഓരോ വട്ടവും button ക്ലിക്ക് ചെയ്യുമ്പോൾ React handleClick വിളിക്കുകയും, ആദ്യമുള്ള 0 മാറി 1 ആവുകയും, രണ്ടാമത്തെ ക്ലിക്കിൽ 2 ആവുകയും അങ്ങനെ ഓരോ ക്ലിക്കും count-നെ കൂട്ടിക്കൊണ്ടിരിക്കും .
ഇനി നമ്മൾ ഇതേ component രണ്ടു സ്ഥലങ്ങളിൽ render ചെയ്താലോ? ഓരോന്നിനും അതിന്റെതായ state ലഭിക്കും. അതായത് വ്യത്യസ്തമായ സ്ഥലങ്ങളിലെ componentsനു വ്യത്യസ്ത state ആയിരിക്കും എന്നർത്ഥം. താഴെ ഉള്ള ഓരോ ബട്ടണും വേറെ വേറെ ക്ലിക്ക് ചെയ്തു നോക്കൂ
import { useState } from 'react';

export default function MyApp() {
  return (
    <div>
      <h1>Counters that update separately</h1>
      <MyButton />
      <MyButton />
    </div>
  );
}

function MyButton() {
  const [count, setCount] = useState(0);

  function handleClick() {
    setCount(count + 1);
  }

  return (
    <button onClick={handleClick}>
      Clicked {count} times
    </button>
  );
}
ഓരോ componentഉം സ്വന്തമായിട്ടുള്ള count “ഓർത്തിരിക്കുന്നത്” ശ്രദ്ധിച്ചോ?
Hooks ഉപയോഗിക്കുന്ന വിധം
use എന്ന് വെച്ച് തുടങ്ങുന്ന function ആണ് Hooks. useState React തന്നെ തരുന്ന ഒരു Hook ആണ്. useState പോലെ React തരുന്ന Hooksനെ അറിയാൻ API reference. നോക്കാം. അതുപോലെ നമുക്ക് സ്വന്തമായി Hooks നിർമിക്കാനും സാധിക്കും.
Hooks ഒരു function ആണെന്ന് പറഞ്ഞല്ലോ. എന്നാൽ മറ്റു functionsനേക്കാൾ കൂടുതൽ റൂളുകൾ Hooksനുണ്ട്. Hooks എപ്പോഴും component-ന്റെ തുടക്കത്തിൽ ആയിരിക്കണം. ഉദാഹരണത്തിന് ഒരു condition-ന്റെ ഉള്ളിലോ loop-ന്റെ ഉള്ളിലോ useState hook ഉപയോഗിക്കാൻ പറ്റില്ല. അങ്ങനെ ഉപയോഗിക്കാൻ നമ്മൾ പുതിയൊരു component ഉണ്ടാക്കി അതിന്റെ ഉള്ളിൽ useState എഴുതണം.
എങ്ങനെ രണ്ടു componentsനിടയിൽ data പങ്കിടാം?
നമ്മൾ നേരത്തെ കണ്ട example ഓർമ ഉണ്ടോ? അതിൽ ഓരോ MyButton component-നും സ്വന്തമായി ഒരു count ഉണ്ടായിരുന്നു അല്ലെ? ഓരോ ബട്ടണും ക്ലിക്ക് ചെയ്തപ്പോൾ ആ ബട്ടണിന്റെ മാത്രം count മാറി. അതായത് താഴെ ചിത്രത്തിൽ പറയുന്ന പോലെ:
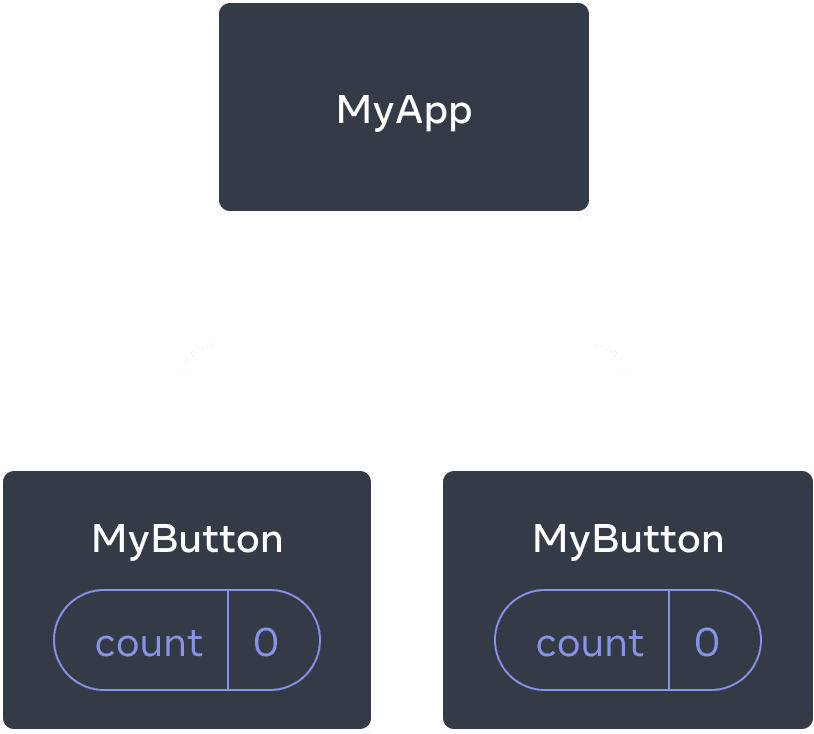
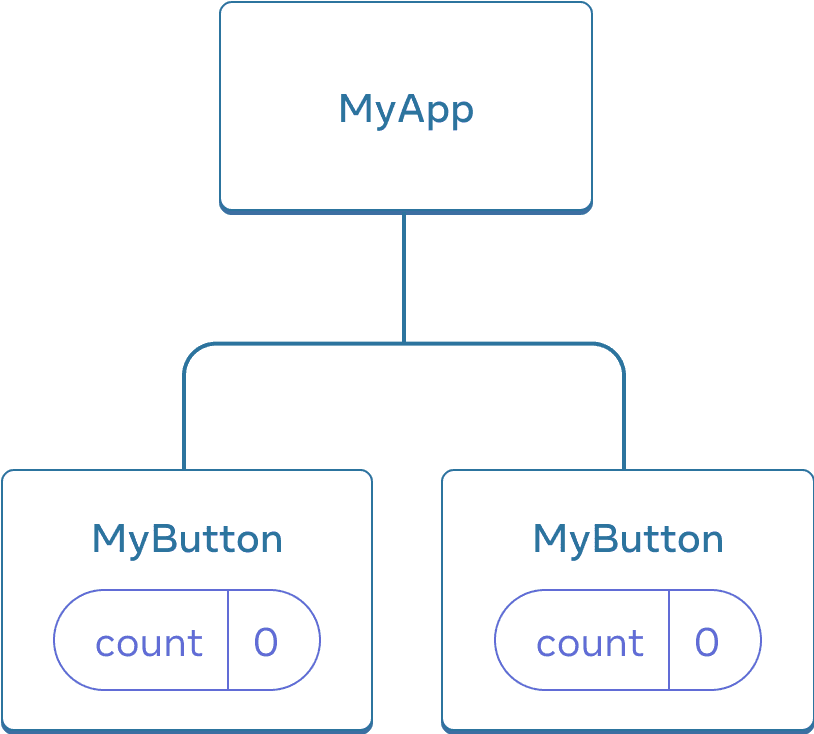
ആദ്യം രണ്ടു MyButton-ന്റെ count state 0 ആയിരുന്നു
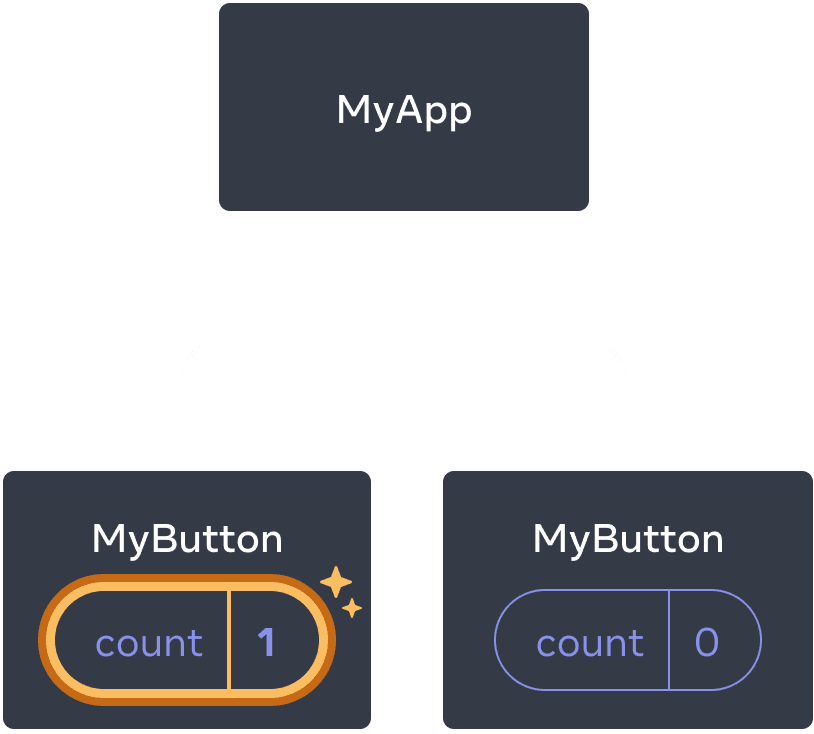
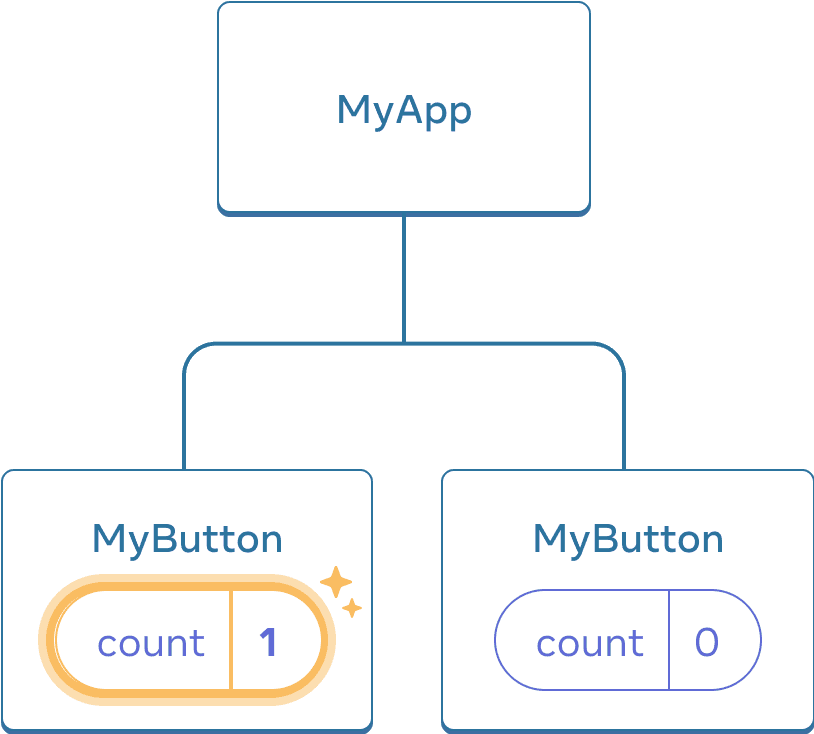
ക്ലിക്കിൽ ആദ്യത്തെ MyButton-ന്റെ count മാത്രം 1 ആയി മാറി
ചിലപ്പോൾ നമുക്ക് രണ്ടു componentഉം ഒരു ഡാറ്റ പങ്കിടേണ്ട ആവശ്യം വരും. എന്നിട്ട് ആ ഡാറ്റ മാറുമ്പോൾ രണ്ടു component ഒരുമിച്ച് അപ്ഡേറ്റ് ചെയ്യുകയും വേണം.
രണ്ടു MyButtonഉം ഒരേ count കാണിക്കാനും ഒരുമിച്ച് അപ്ഡേറ്റ് ചെയ്യാനും, നമ്മുടെ stateനെ ഓരോ button-ൽ നിന്നും പുറത്തു കൊണ്ട് പോയി “മുകളിലോട്ട്” അയക്കണം. നമുക്ക് വേണ്ട രണ്ടു componentഉം പൊതുവായിട്ടുള്ള ഒരു parent component-ലേക്ക് അയച്ചാൽ നമുക്ക് ഒരു count സ്റ്റേറ്റ് മാത്രമേ ഉണ്ടാവൂ.
നമ്മുടെ ഉദാഹരണത്തിൽ, അത് <MyApp /> component ആണ്:
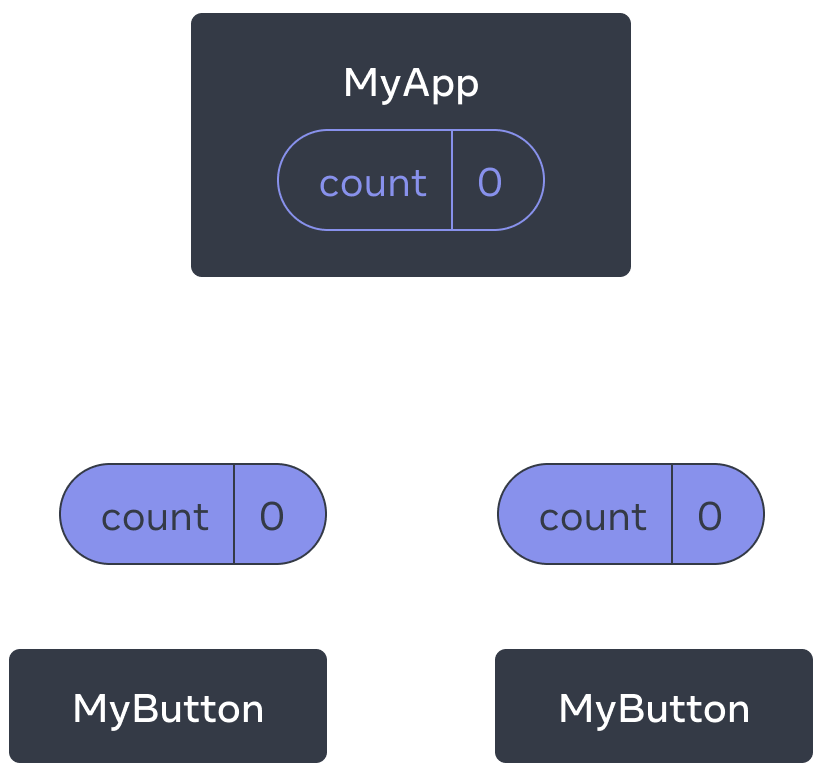
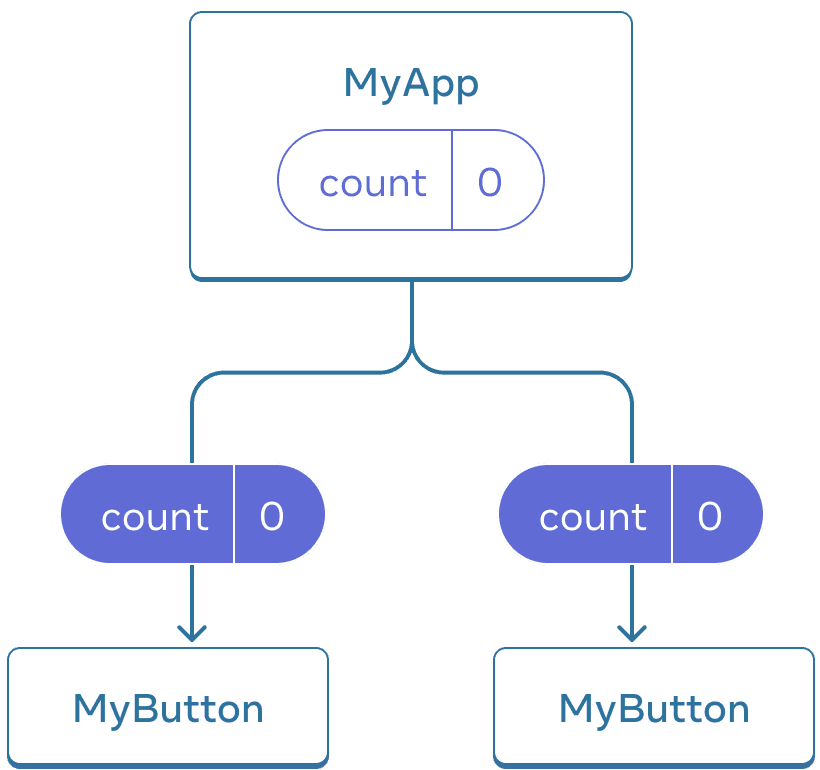
ആദ്യം MyApp-ന്റെ count state 0 ആണ്. അത് താഴെ രണ്ടു childrenഉം കൊടുക്കുന്നു
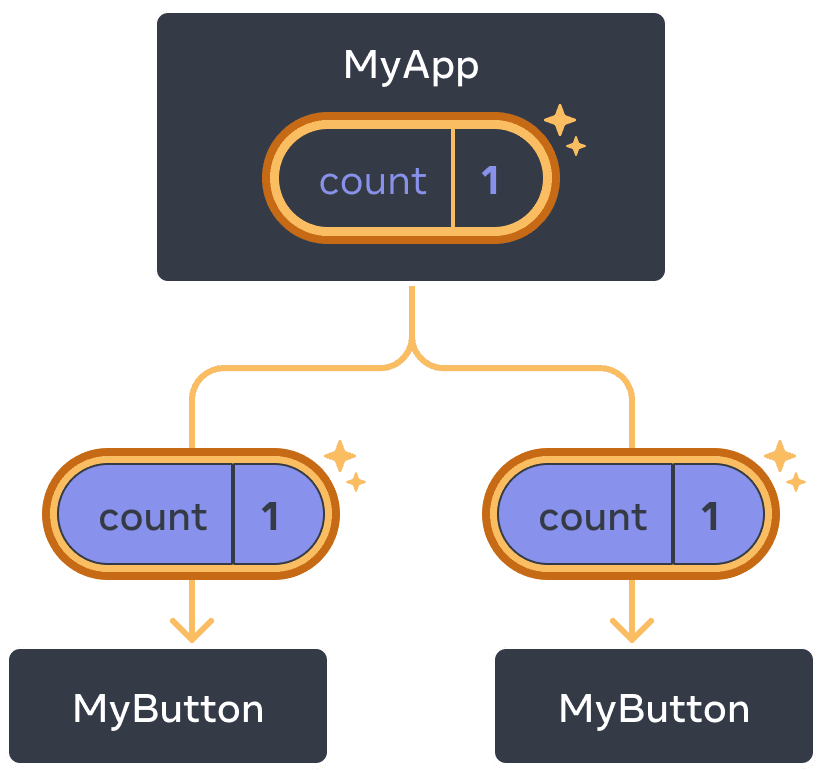
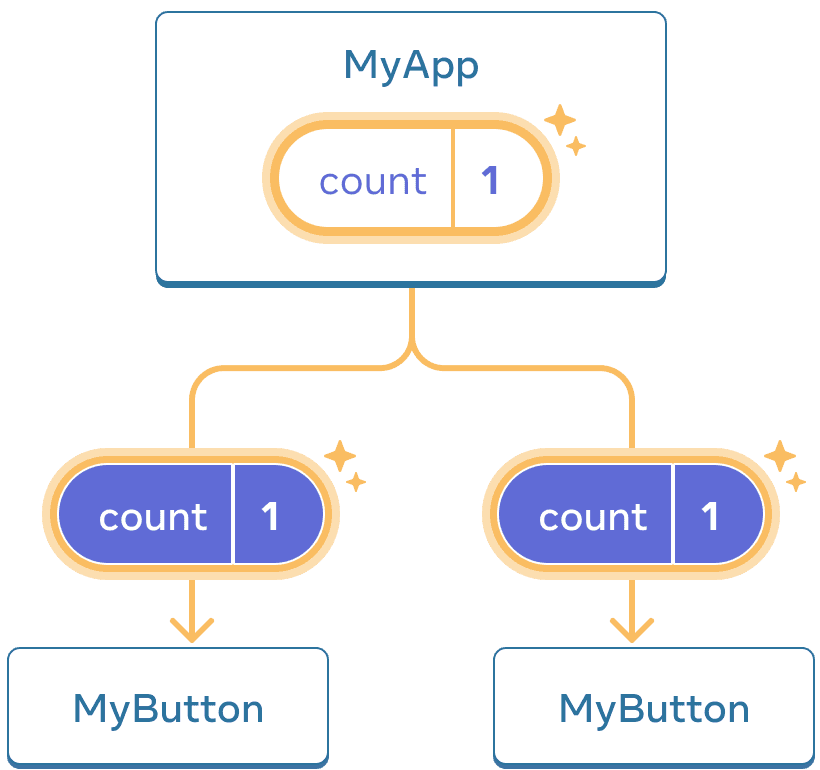
ക്ലിക്കിൽ MyApp തന്റെ count state, 1 ആക്കി മാറ്റുന്നു. പുതിയ count താഴെ 2 childrenഉം കൊടുക്കുന്നു.
ഇപ്പോൾ യൂസർ ഏത് ബട്ടൺ ക്ലിക്ക് ചെയ്താലും MyApp-ലെ count ആണ് മാറുന്നത്, ആ മാറ്റമാണ് രണ്ടു MyButtonലെ count മാറ്റുന്നത്. ഇത് ഇനി എങ്ങനെ കോഡിൽ വരുത്താം എന്ന് നോക്കാം
ആദ്യം MyButton-ലെ state-നെ മുകളിലോട്ട്, MyAppലേക്ക്, കൊണ്ട് പോവാം:
export default function MyApp() {
  const [count, setCount] = useState(0);

  function handleClick() {
    setCount(count + 1);
  }

  return (
    <div>
      <h1>Counters that update separately</h1>
      <MyButton />
      <MyButton />
    </div>
  );
}

function MyButton() {
  // ... we're moving code from here ...
}
എന്നിട്ട് ഇപ്പോൾ കൊണ്ട് പോയ stateന്റെ ഡീറ്റെയിൽസ് മുകളിലെ MyApp-ൽ നിന്നും, താഴെ ഉള്ള രണ്ടു MyButton-നു കൊടുക്കാം. നമ്മൾ നേരത്തെ പഠിച്ച Curly Braces ഇതിനു വേണ്ടി ഉപയോഗിക്കാം:
export default function MyApp() {
  const [count, setCount] = useState(0);

  function handleClick() {
    setCount(count + 1);
  }

  return (
    <div>
      <h1>Counters that update together</h1>
      <MyButton count={count} onClick={handleClick} />
      <MyButton count={count} onClick={handleClick} />
    </div>
  );
}
ഇങ്ങനെ നമ്മൾ ഇപ്പോൾ താഴേക്കു കൊടുക്കുന്ന ഇൻഫോർമേഷനെ props എന്നാണ് വിളിക്കുക. ഇപ്പൊ MyApp componentനു count എന്ന state-ഉം handleClick എന്ന event handler-ഉം ഉണ്ട്. ഈ രണ്ടുമാണ് താഴേക്ക് props ആയിട്ടു അയച്ചു കൊടുക്കുന്നത്.
അവസാനമായി, നമ്മുടെ MyButton ഈ props വായിക്കാൻ പ്രാപ്തമാക്കിയാൽ നമ്മുടെ ജോലി കഴിഞ്ഞു
function MyButton({ count, onClick }) {
  return (
    <button onClick={onClick}>
      Clicked {count} times
    </button>
  );
}
When you click the button, the onClick handler fires. Each button’s onClick prop was set to the handleClick function inside MyApp, so the code inside of it runs. That code calls setCount(count + 1), incrementing the count state variable. The new count value is passed as a prop to each button, so they all show the new value. This is called “lifting state up”. By moving state up, you’ve shared it between components.
ents.
ബട്ടണിൽ ക്ലിക്ക് ചെയ്യുമ്പോൾ താഴെ പറയുന്നത് പോലെ നടക്കും:
- ബട്ടണിന്റെ
onClickhandler വിളിക്കപ്പെടും - ബട്ടണിന്റെ
onClick,MyAppന്റെhandleClickആയിട്ടാണ് സെറ്റ് ചെയ്തിട്ടുള്ളത്. അതിന്റെ ഉള്ളിലെ കോഡ് റൺ ആവും. handleClickന്റെ ഉള്ളിൽsetCount(count + 1)വിളിക്കപ്പെടും.countന്റെ വാല്യൂ കുടും- പുതിയ
count, prop ആയിട്ട് താഴെ ഉള്ള 2 ബട്ടണിനും കൊടുക്കും. - രണ്ടു ബട്ടണും പുതിയ
countവാല്യൂ render ചെയ്യും.
ഇങ്ങനെ മുകളിലോട്ട് സ്റ്റേറ്റ് കൊണ്ടുപോവുന്നതിനെ ""lifting state up” എന്ന് പറയാം. നമ്മൾ സ്റ്റേറ്റ് ലിഫ്റ്റ് ചെയ്തപ്പോൾ രണ്ടു component-നും state ഷെയർ ചെയ്യാൻ പറ്റി.
import { useState } from 'react';

export default function MyApp() {
  const [count, setCount] = useState(0);

  function handleClick() {
    setCount(count + 1);
  }

  return (
    <div>
      <h1>Counters that update together</h1>
      <MyButton count={count} onClick={handleClick} />
      <MyButton count={count} onClick={handleClick} />
    </div>
  );
}

function MyButton({ count, onClick }) {
  return (
    <button onClick={onClick}>
      Clicked {count} times
    </button>
  );
}
Next Steps
React-ന്റെ അടിസ്ഥാന പാഠങ്ങൾ മനസ്സിലാക്കാൻ നിങ്ങൾക്കു പറ്റി എന്ന് വിചാരിക്കുന്നു.
അടുത്തതായി, ഈ Tutorial-ലൂടെ പഠിച്ചതൊക്കെ വെച്ച് ഒരു React മിനി ആപ്പ് ഉണ്ടാക്കാൻ നോക്കാം.